快速开始
大约 5 分钟
快速开始
通过本文可以实现一个集成聊天 SDK 的简单 app。
实现原理
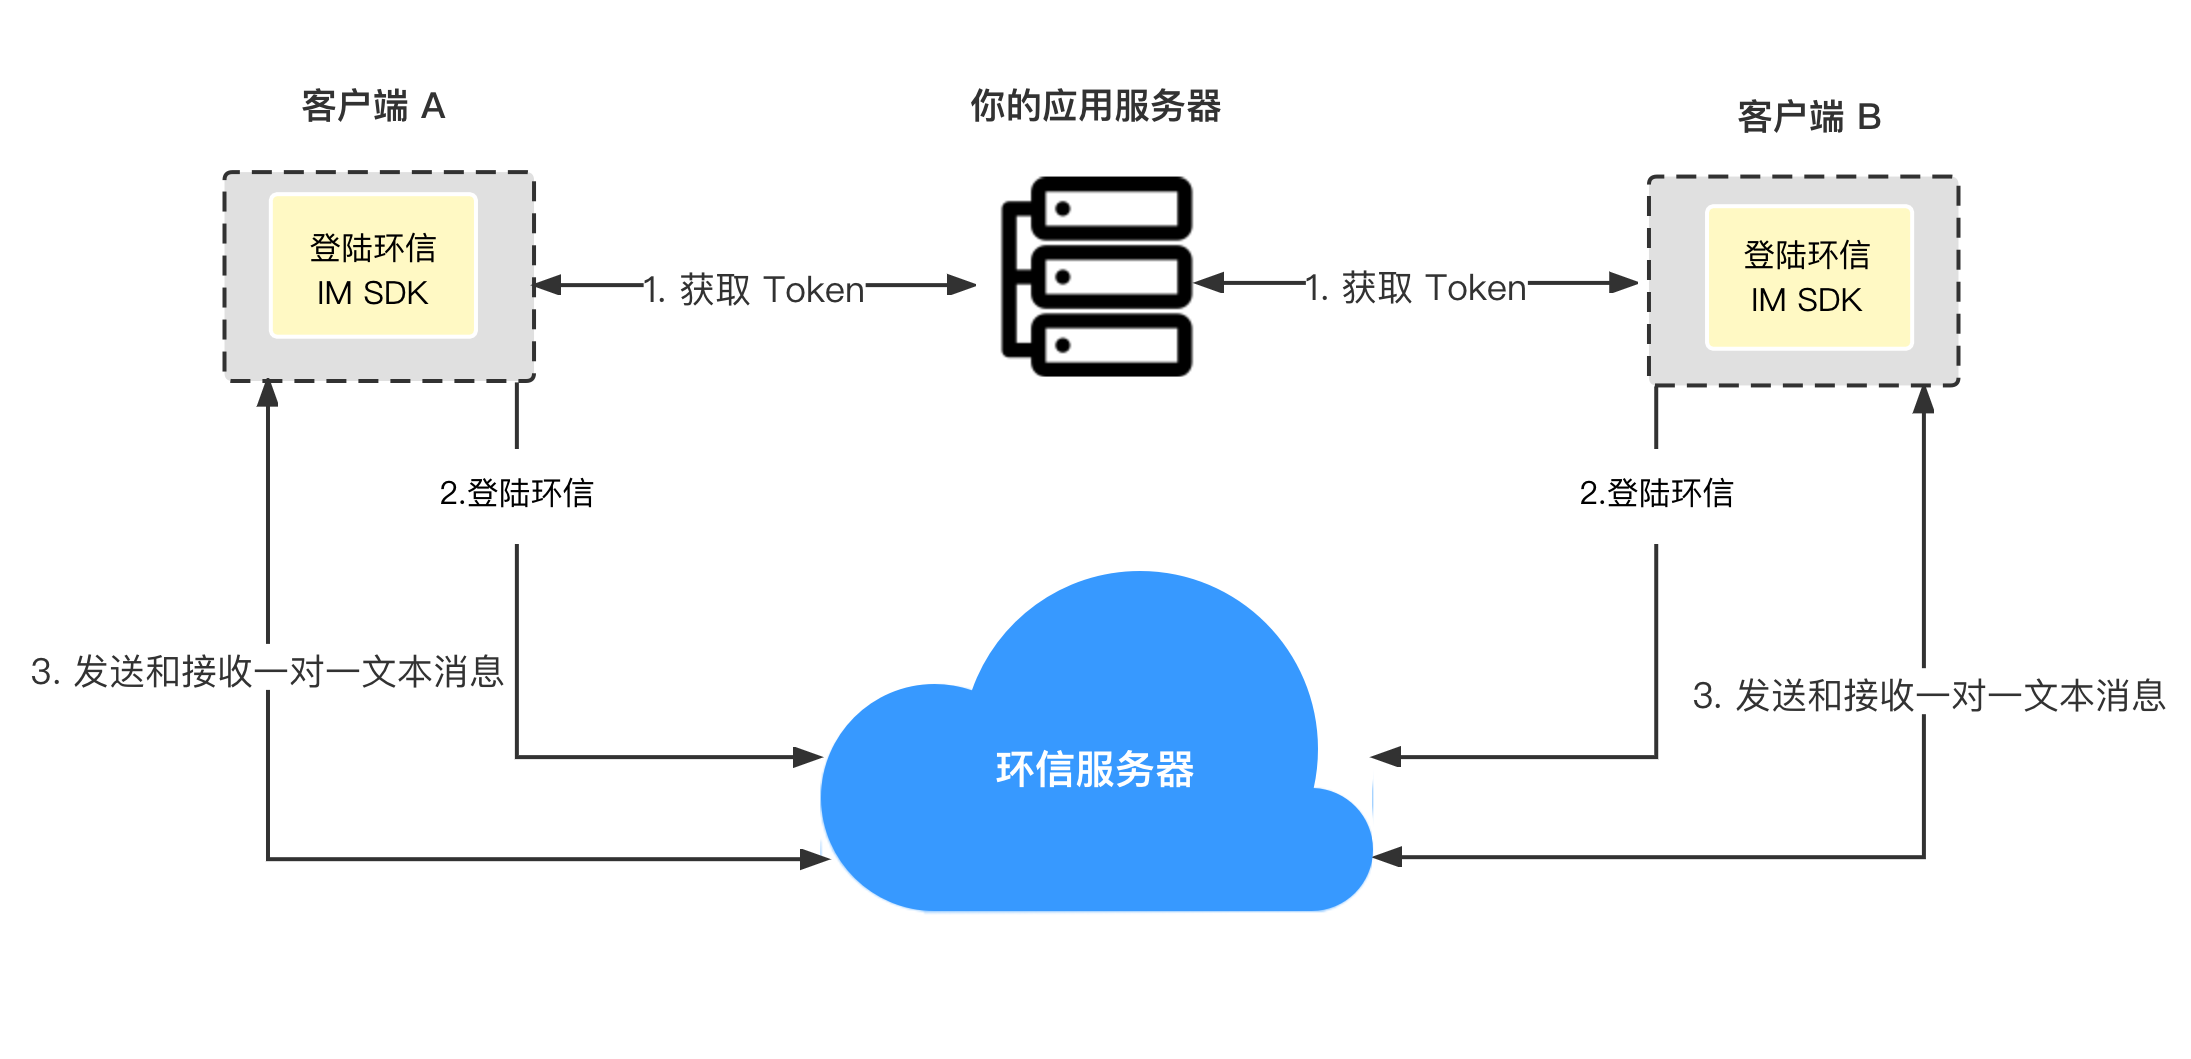
下图展示在客户端发送和接收一对一文本消息的工作流程。

如上图所示,发送和接收单聊消息的步骤如下:
- 客户端向你的应用服务器请求 Token,你的应用服务器返回 Token。
- 客户端 A 和客户端 B 使用获得的 Token 登录环信即时通讯系统。
- 客户端 A 发送消息到环信即时通讯服务器。
- 环信即时通讯服务器将消息发送到客户端 B,客户端 B 接收消息。
前提条件
开始前,请确保你的开发环境满足如下要求:
- Xcode 12.4 或以上版本,包括命令行工具;
- iOS 10 或以上版本;
- Android SDK API 等级 21 或以上版本;
- Android Studio 4.0 或以上版本,包括 JDK 1.8 或以上版本;
- CocoaPods 包管理工具;
- Flutter 2.10 或以上版本;
- Dart 2.16 或以上版本;
配置开发或者运行环境如果遇到问题,请参考 这里。
- 有效的环信即时通讯 IM 开发者账号和 App Key,详见 环信即时通讯云控制台。
项目设置
使用命令创建项目
打开终端,进入需要创建项目的目录,输入命令进行 flutter create 项目创建:
flutter create quick_start
设置 Android
- 打开文件
quick_start/android/app/build.gradle在文件最后添加:
android {
    defaultConfig {
        minSdkVersion 21
    }
}
- 打开文件
quick_start/android/app/src/main/AndroidManifest.xml,在</application>下添加:
<uses-permission android:name="android.permission.INTERNET" />
<uses-permission android:name="android.permission.ACCESS_NETWORK_STATE"/>
<uses-permission android:name="android.permission.WAKE_LOCK"/>
- 在
quick_start/android/app/proguard-rules.pro中设置免混淆规则:
-keep class com.hyphenate.** {*;}
-dontwarn  com.hyphenate.**
设置 iOS
iOS 需要 iOS 10.0 以上版本,
打开文件 quick_start/ios/Runner.xcodeproj,修改:TARGETS -> General -> Deployment info, 设置 iOS 版本为 10.0。
集成 SDK
在终端命令行,输入命令添加依赖:
cd quick_start
flutter pub add im_flutter_sdk
flutter pub get
添加示例代码
打开 quick_start/lib/main.dart 文件,引入头文件:
import 'package:flutter/material.dart';
import 'package:im_flutter_sdk/im_flutter_sdk.dart';
修改 _MyHomePageState 代码:
class _MyHomePageState extends State<MyHomePage> {
ScrollController scrollController = ScrollController();
String _username = "";
String _password = "";
String _messageContent = "";
String _chatId = "";
final List<String> _logText = [];
void initState() {
super.initState();
_initSDK();
_addChatListener();
}
Widget build(BuildContext context) {
return Scaffold(
appBar: AppBar(
title: Text(widget.title),
),
body: Container(
padding: const EdgeInsets.only(left: 10, right: 10),
child: Column(
crossAxisAlignment: CrossAxisAlignment.stretch,
mainAxisSize: MainAxisSize.max,
children: [
TextField(
decoration: const InputDecoration(hintText: "Enter username"),
onChanged: (username) => _username = username,
),
TextField(
decoration: const InputDecoration(hintText: "Enter password"),
onChanged: (password) => _password = password,
),
const SizedBox(height: 10),
Row(
mainAxisAlignment: MainAxisAlignment.spaceEvenly,
children: [
Expanded(
flex: 1,
child: TextButton(
onPressed: _signIn,
child: const Text("SIGN IN"),
style: ButtonStyle(
foregroundColor: MaterialStateProperty.all(Colors.white),
backgroundColor:
MaterialStateProperty.all(Colors.lightBlue),
),
),
),
const SizedBox(width: 10),
Expanded(
child: TextButton(
onPressed: _signOut,
child: const Text("SIGN OUT"),
style: ButtonStyle(
foregroundColor: MaterialStateProperty.all(Colors.white),
backgroundColor:
MaterialStateProperty.all(Colors.lightBlue),
),
),
),
const SizedBox(width: 10),
Expanded(
child: TextButton(
onPressed: _signUp,
child: const Text("SIGN UP"),
style: ButtonStyle(
foregroundColor: MaterialStateProperty.all(Colors.white),
backgroundColor:
MaterialStateProperty.all(Colors.lightBlue),
),
),
),
],
),
const SizedBox(height: 10),
TextField(
decoration: const InputDecoration(
hintText: "Enter the username you want to send"),
onChanged: (chatId) => _chatId = chatId,
),
TextField(
decoration: const InputDecoration(hintText: "Enter content"),
onChanged: (msg) => _messageContent = msg,
),
const SizedBox(height: 10),
TextButton(
onPressed: _sendMessage,
child: const Text("SEND TEXT"),
style: ButtonStyle(
foregroundColor: MaterialStateProperty.all(Colors.white),
backgroundColor: MaterialStateProperty.all(Colors.lightBlue),
),
),
Flexible(
child: ListView.builder(
controller: scrollController,
itemBuilder: (_, index) {
return Text(_logText[index]);
},
itemCount: _logText.length,
),
),
],
),
),
);
}
void _initSDK() async {
}
void _addChatListener() {
}
void _signIn() async {
}
void _signOut() async {
}
void _signUp() async {
}
void _sendMessage() async {
}
void _addLogToConsole(String log) {
_logText.add(_timeString + ": " + log);
setState(() {
scrollController.jumpTo(scrollController.position.maxScrollExtent);
});
}
String get _timeString {
return DateTime.now().toString().split(".").first;
}
}
初始化 SDK
在 _initSDK 方法中添加 SDK 初始化:
void _initSDK() async {
    EMOptions options = EMOptions(
        appKey: "<#Your AppKey#>",
        autoLogin: false,
    );
    await EMClient.getInstance.init(options);
    // 通知 SDK UI 已准备好。该方法执行后才会收到 `EMChatRoomEventHandler`、`EMContactEventHandler` 和 `EMGroupEventHandler` 回调。
    await EMClient.getInstance.startCallback();
}
注册环信 IM 用户
Demo 中使用 开放注册,此操作需要在环信后台开启 开放注册。在开放注册模式下,允许通过 App 客户端直接注册环信用户,正式环境中请使用 授权注册。
在 _signUp 方法中添加注册代码:
void _signUp() async {
  if (_username.isEmpty || _password.isEmpty) {
    _addLogToConsole("username or password is null");
    return;
  }

  try {
    await EMClient.getInstance.createAccount(_username, _password);
    _addLogToConsole("sign up succeed, username: $_username");
  } on EMError catch (e) {
    _addLogToConsole("sign up failed, e: ${e.code} , ${e.description}");
  }
}
添加登录
在 _signIn 方法中添加登录代码。
void _signIn() async {
    if (_username.isEmpty || _password.isEmpty) {
        _addLogToConsole("username or password is null");
        return;
    }

    try {
        await EMClient.getInstance.login(_username, _password);
        _addLogToConsole("sign in succeed, username: $_username");
    } on EMError catch (e) {
        _addLogToConsole("sign in failed, e: ${e.code} , ${e.description}");
    }
}
添加退出
在 _signOut 方法中添加退出代码。
void _signOut() async {
    try {
        await EMClient.getInstance.logout(true);
        _addLogToConsole("sign out succeed");
    } on EMError catch (e) {
        _addLogToConsole(
            "sign out failed, code: ${e.code}, desc: ${e.description}");
    }
}
添加发消息
在 _sendMessage 方法中添加发消息代码。
void _sendMessage() async {
  if (_chatId.isEmpty || _messageContent.isEmpty) {
    _addLogToConsole("single chat id or message content is null");
    return;
  }

  var msg = EMMessage.createTxtSendMessage(
    targetId: _chatId,
    content: _messageContent,
  );

  EMClient.getInstance.chatManager.sendMessage(msg);
}
添加收消息监听
在 _addChatListener 方法中添加代码。
void _addChatListener() {

  // 添加消息状态变更监听
  EMClient.getInstance.chatManager.addMessageEvent(
      // ChatMessageEvent 对应的 key。
        "UNIQUE_HANDLER_ID",
        ChatMessageEvent(
          onSuccess: (msgId, msg) {
            _addLogToConsole("send message succeed");
          },
          onProgress: (msgId, progress) {
            _addLogToConsole("send message succeed");
          },
          onError: (msgId, msg, error) {
            _addLogToConsole(
              "send message failed, code: ${error.code}, desc: ${error.description}",
            );
          },
        ));


  // 添加收消息监听
  EMClient.getInstance.chatManager.addEventHandler(
    // EMChatEventHandler 对应的 key。
    "UNIQUE_HANDLER_ID",
    EMChatEventHandler(
      onMessagesReceived: (messages) {
        for (var msg in messages) {
          switch (msg.body.type) {
            case MessageType.TXT:
              {
                EMTextMessageBody body = msg.body as EMTextMessageBody;
                _addLogToConsole(
                  "receive text message: ${body.content}, from: ${msg.from}",
                );
              }
              break;
            case MessageType.IMAGE:
              {
                _addLogToConsole(
                  "receive image message, from: ${msg.from}",
                );
              }
              break;
            case MessageType.VIDEO:
              {
                _addLogToConsole(
                  "receive video message, from: ${msg.from}",
                );
              }
              break;
            case MessageType.LOCATION:
              {
                _addLogToConsole(
                  "receive location message, from: ${msg.from}",
                );
              }
              break;
            case MessageType.VOICE:
              {
                _addLogToConsole(
                  "receive voice message, from: ${msg.from}",
                );
              }
              break;
            case MessageType.FILE:
              {
                _addLogToConsole(
                  "receive image message, from: ${msg.from}",
                );
              }
              break;
            case MessageType.CUSTOM:
              {
                _addLogToConsole(
                  "receive custom message, from: ${msg.from}",
                );
              }
              break;
            case MessageType.CMD:
              {
                // 当前回调中不会有 CMD 类型消息,CMD 类型消息通过 `EMChatEventHandler#onCmdMessagesReceived` 回调接收
              }
              break;
          }
        }
      },
    ),
  );
}
移除消息监听
在 dispose 方法中添加代码移除监听:
void dispose() {
// 移除消息状态监听
EMClient.getInstance.chatManager.removeMessageEvent("UNIQUE_HANDLER_ID");
// 移除收消息监听
EMClient.getInstance.chatManager.removeEventHandle("UNIQUE_HANDLER_ID");
super.dispose();
}
运行项目
以 iOS 为例,首先打开模拟器,然后在终端运行以下命令。
flutter run
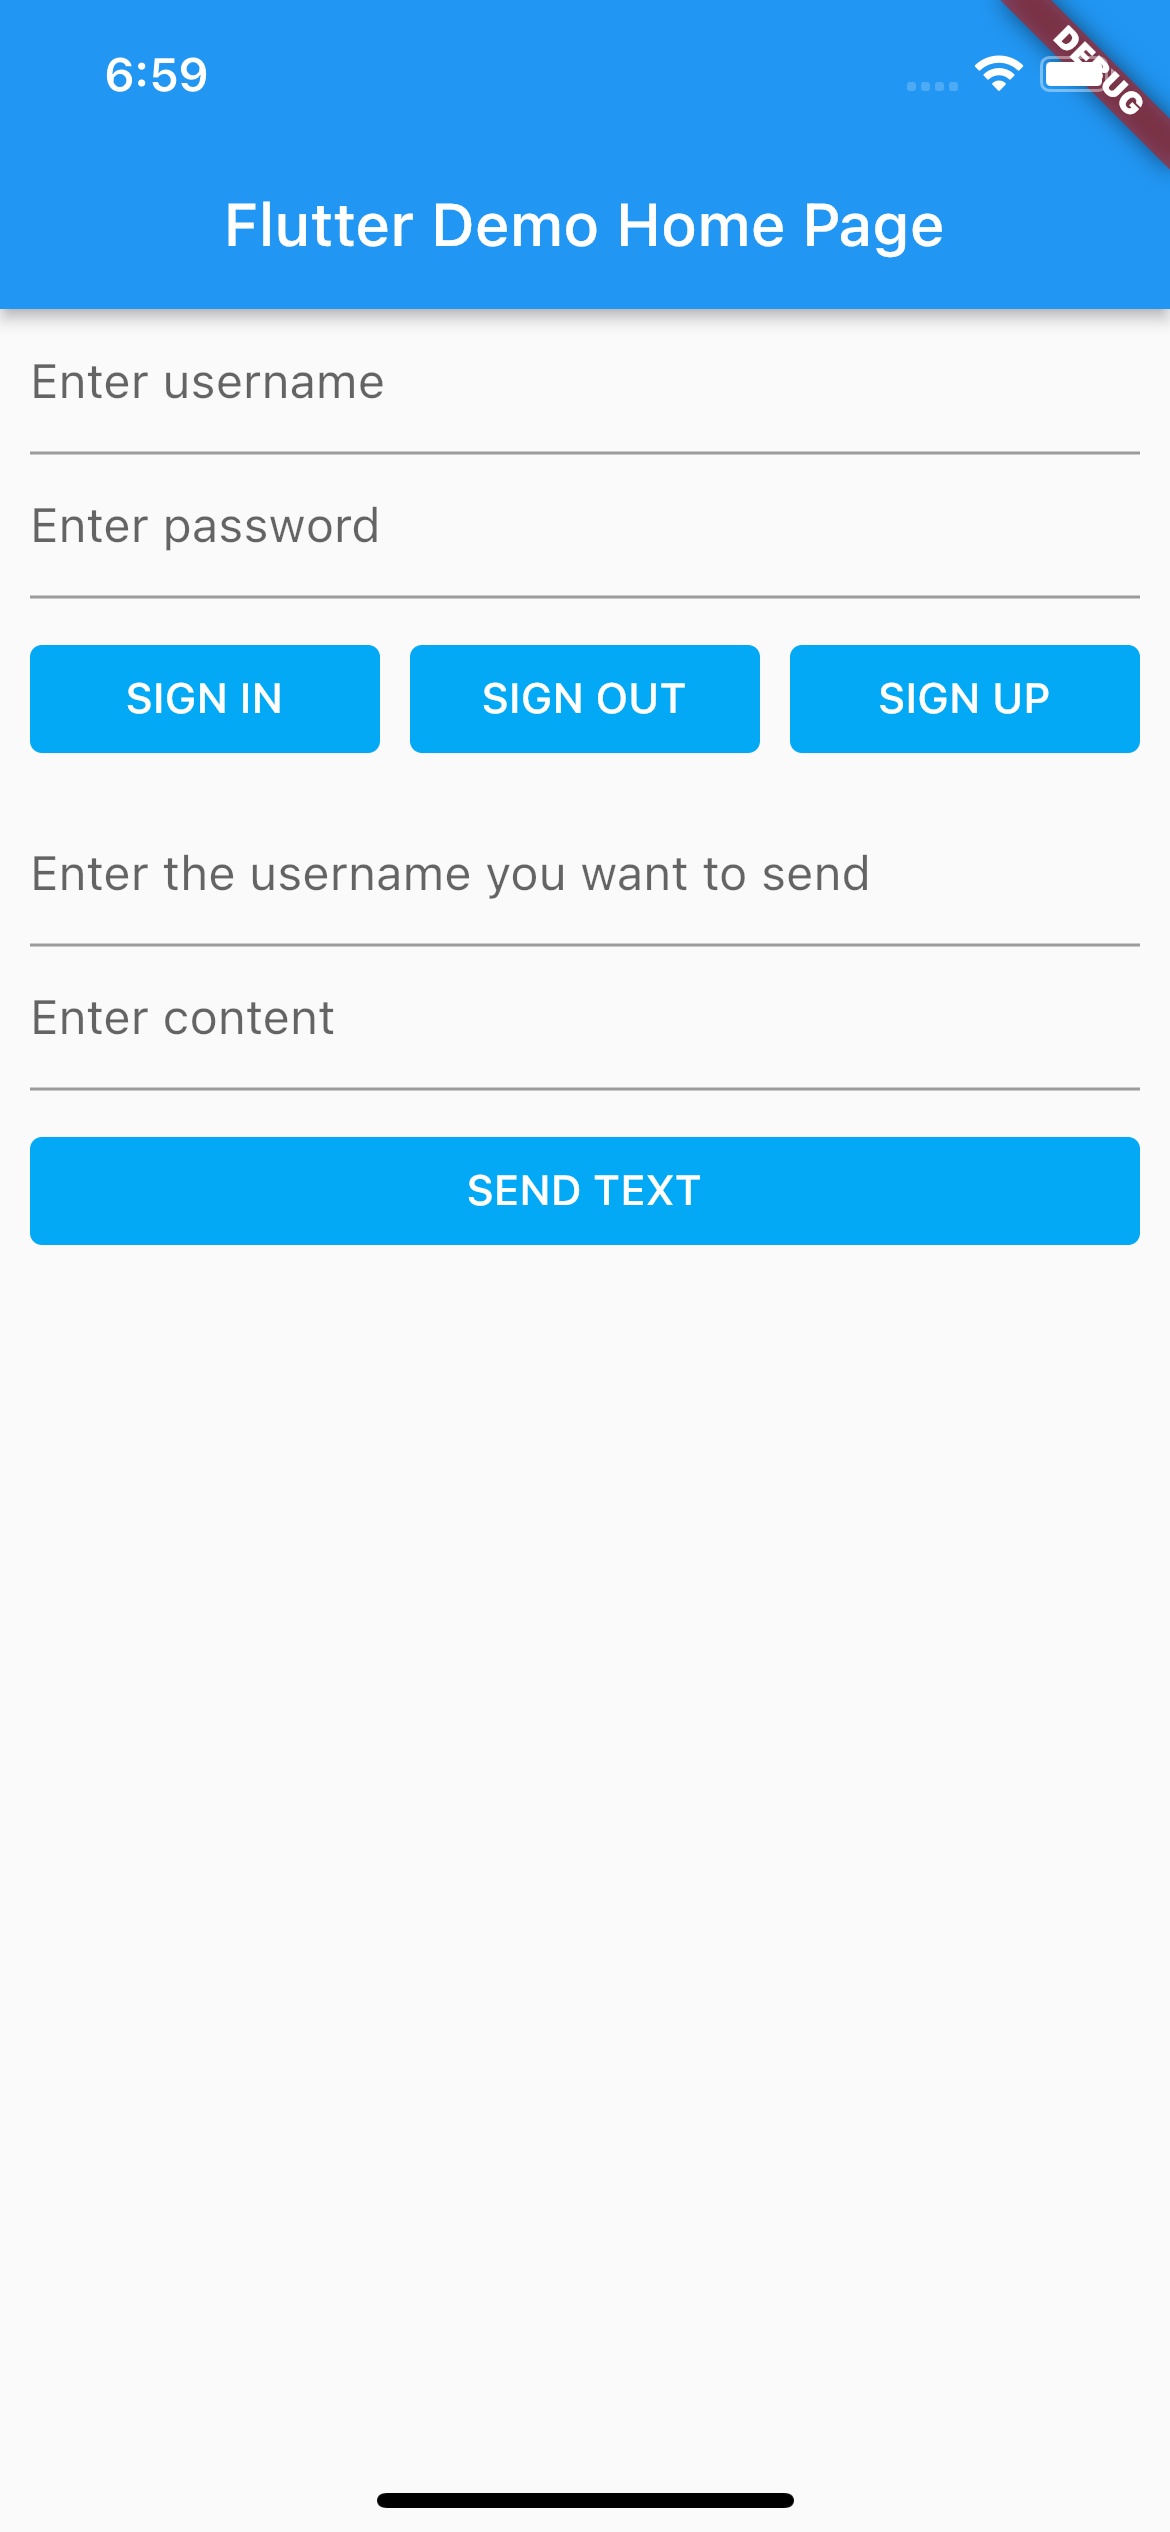
运行结果如下:

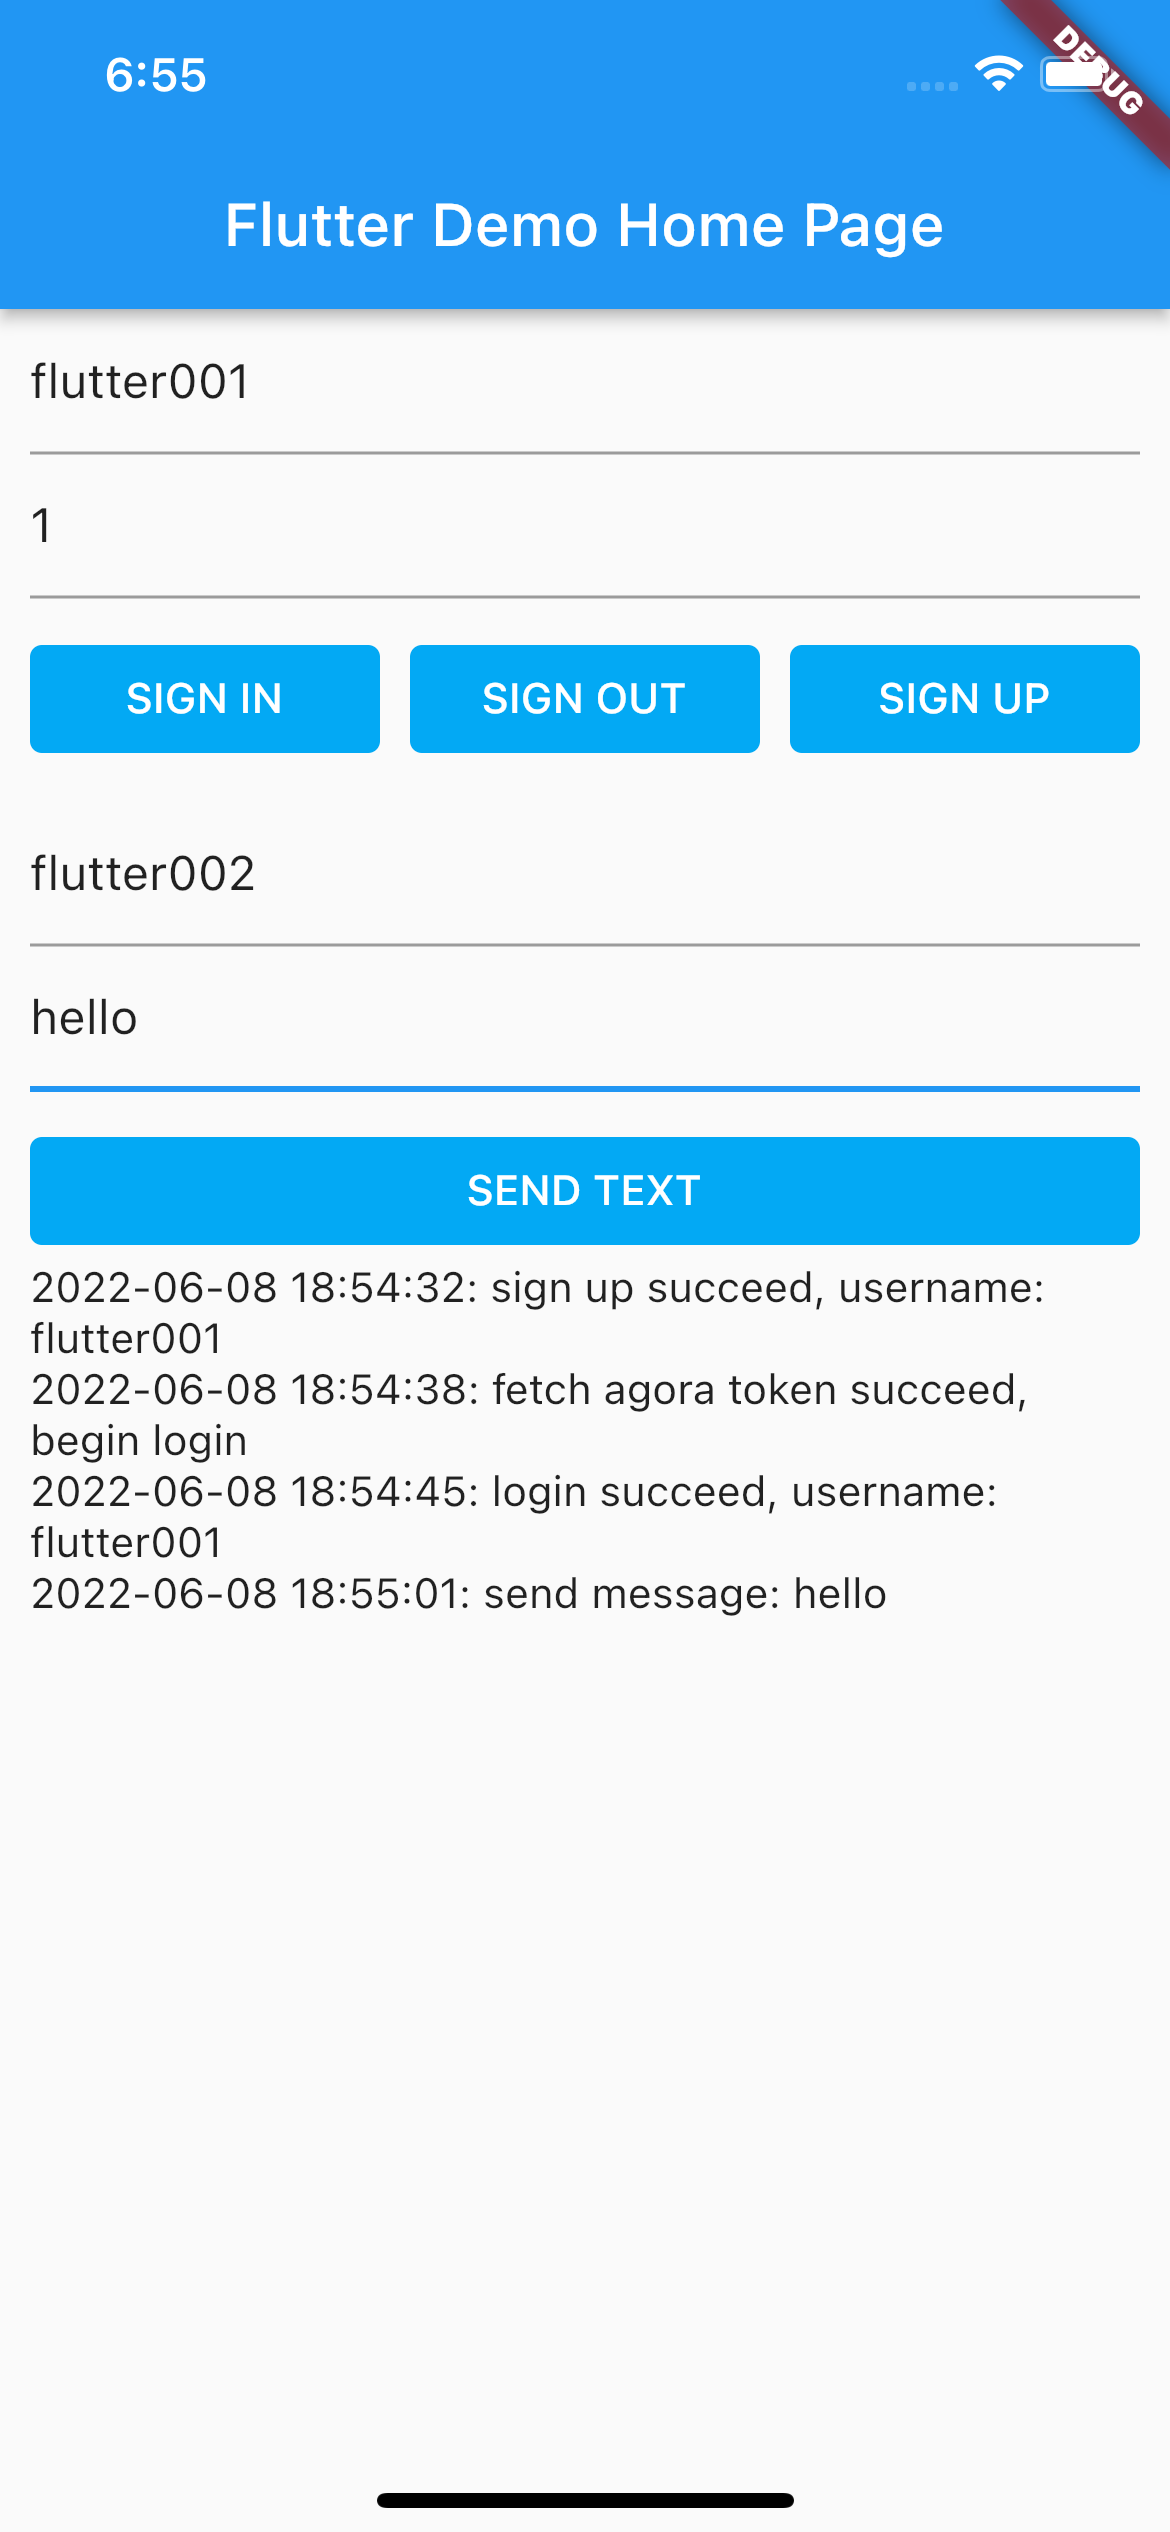
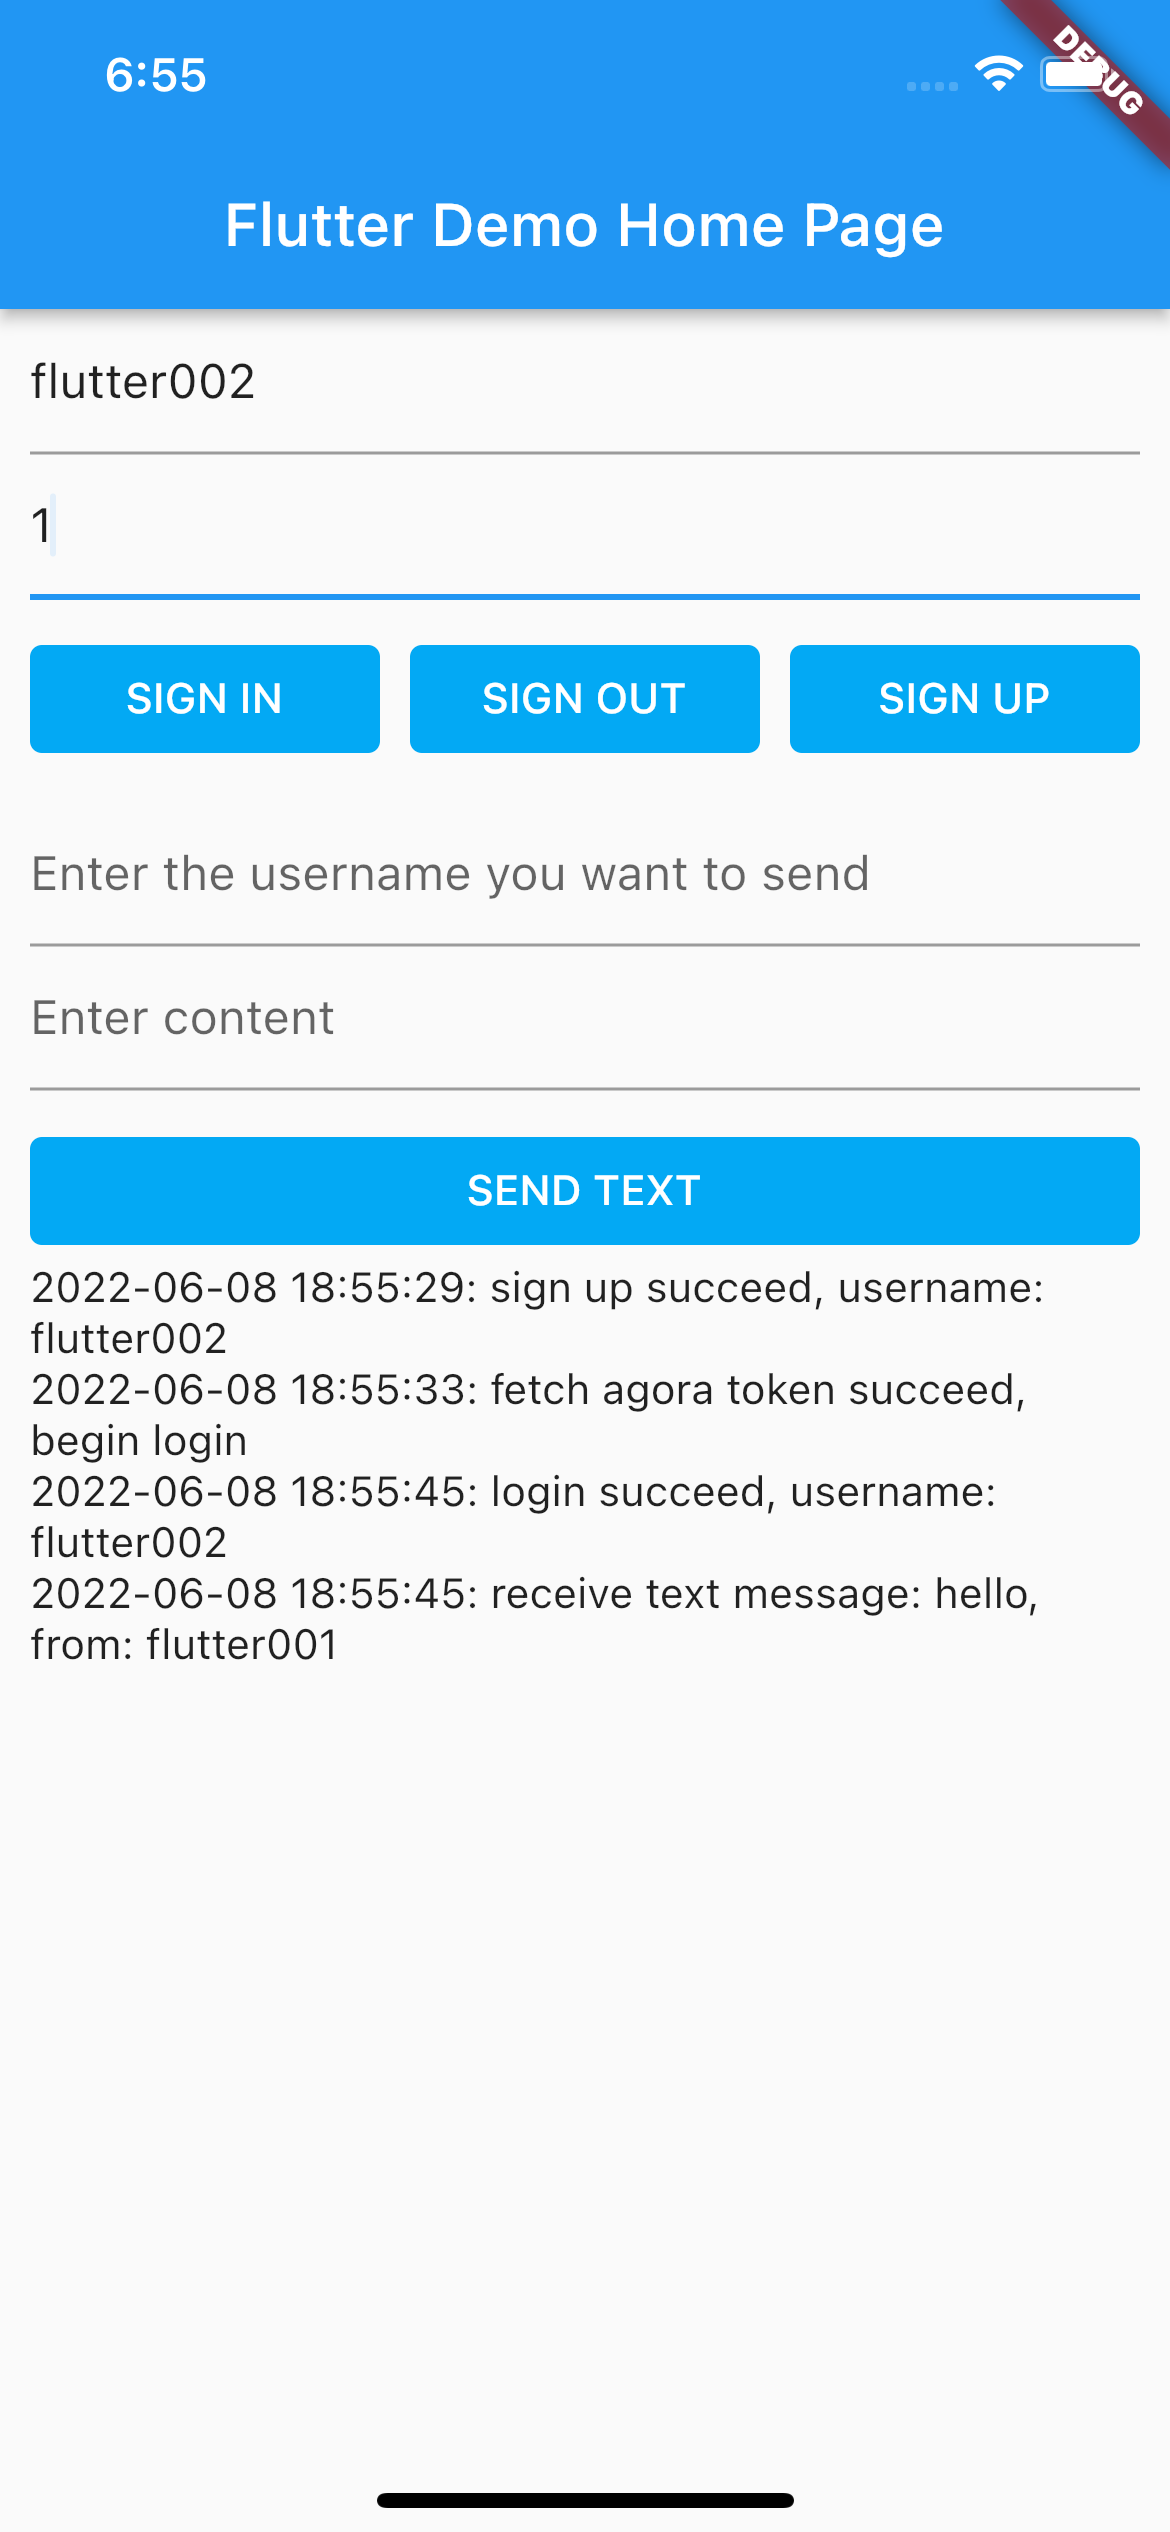
参考以下步骤发送和接收文本消息:
- 输入任意用户名(如
flutter001和flutter002)和密码1,点击SIGN UP创建用户; - 以
flutter001身份登录 Demo,将Enter the username you want to send输如为flutter002, 发送文本消息;

- 以
flutter002身份登录 Demo,查看 Log 信息确认是否都到消息。

后续步骤
为保障通信安全,在正式生产环境中,你需要在自己的 app 服务端生成 Token。详见使用 App Token 鉴权。
